Home / Blog Details
Take your digital marketing to the next level with data-driven strategies and innovative solutions. Let’s create something amazing together!

From Google search results to AI chatbots, we optimize your website so customers can find you faster — and choose you over competitors.
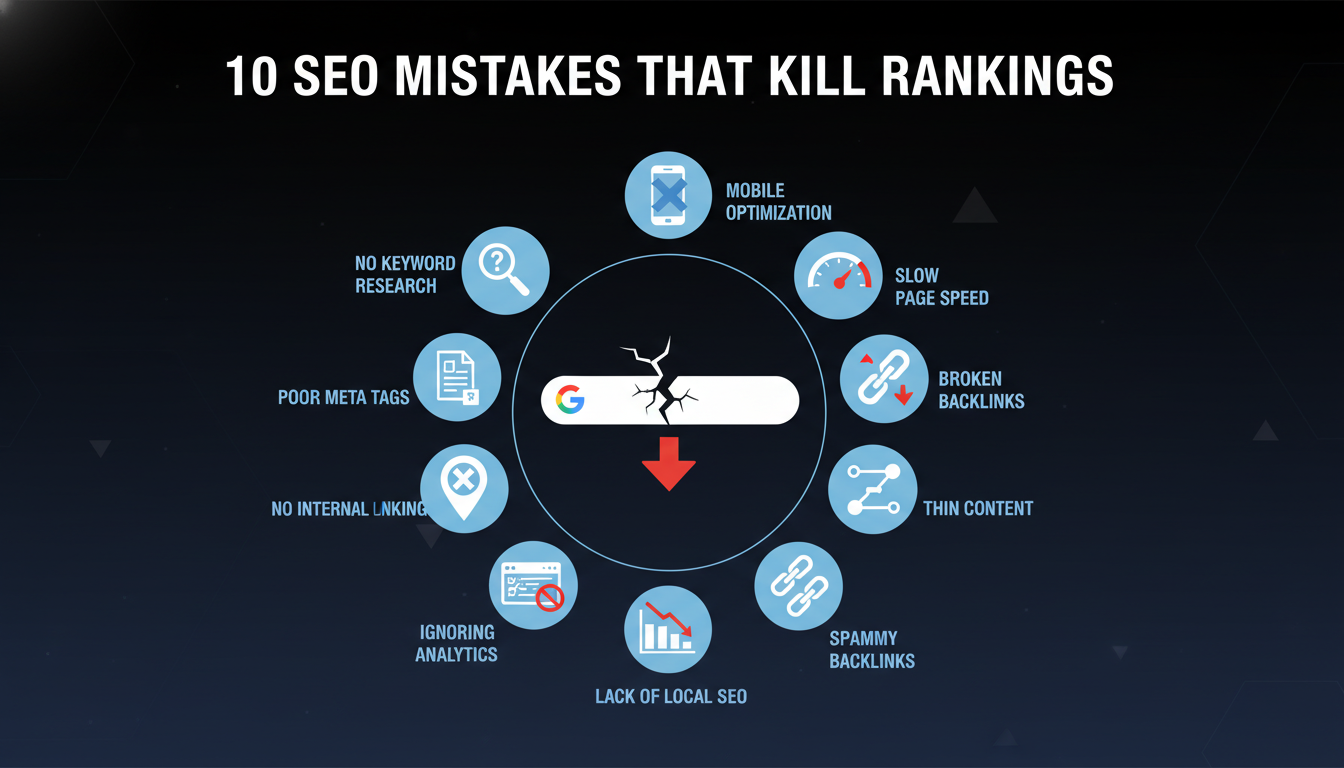
SEO mistakes are errors in how a website is structured, written, or promoted that cause search engines to rank it lower than it deserves. The most damaging mistakes include ignoring search intent, skipping technical audits, publishing thin content, and neglecting local SEO signals. Fixing these issues consistently improves organic visibility, traffic, and leads.
Your website might be invisible on Google right now, and you may not even know it. SEO mistakes are not always obvious. A site can look polished on the surface while quietly bleeding rankings beneath it. Broken internal links, misconfigured canonical tags, thin content, and slow page speeds all tell Google the same thing: this site is not worth promoting.
The problem compounds over time. Each unfixed mistake stacks on the last. Competitors who get the fundamentals right outrank you month after month, while your organic traffic flatlines or drops. For small business owners in Lafayette, LA, this is not a minor inconvenience; it is lost revenue.
This guide covers every major category of SEO mistakes in plain language. You will learn what each error is, why it damages rankings, and exactly how to fix it. Whether you are a business owner, a marketer, or a blogger, you will leave with a clear action plan.
Search intent is the reason behind a search query. Google classifies intent into four types: informational, navigational, commercial, and transactional. When your content mismatches the intent, Google simply does not rank it, regardless of how well-written it is.
For example, if someone searches “best HVAC companies in Lafayette, LA,” they want a list to compare options. If your page delivers a 2,000-word essay on how HVAC systems work, you have failed the intent test. Google knows the difference.
How to fix it: Before writing any page, search for your target keyword in an incognito browser. Study the top five results. Notice their format, depth, and structure. Match the intent, then out-execute the competition on quality.
Publishing content without first understanding your audience is one of the most common SEO mistakes beginners make. You may write about topics you find interesting rather than topics your audience is actively searching.
Real audience research means using tools like Google Search Console, Answer the Public, and Semrush’s Keyword Magic Tool to find the exact language your customers use. It also means studying forums, Reddit threads, and Google’s “People Also Ask” boxes.
How to fix it: Build an audience persona before planning your content calendar. Map every content idea to a real search query with measurable monthly volume.
Duplicate content occurs when the same or nearly identical content appears on two or more URLs on your website. This confuses Google. It does not know which version to rank, so it often ranks neither.
Common causes include www vs. non-www versions, HTTP vs. HTTPS variants, URL parameters from filters or tracking, and paginated pages without proper handling. According to Moz, duplicate content affects a significant portion of sites that have never run a technical audit.
How to fix it: Use canonical tags to tell Google which URL is the master version. Redirect all duplicate variants to the canonical URL using 301 redirects.
Google’s Helpful Content system specifically targets content that is written for search engines rather than people. Thin content is content with little original insight, no first-hand experience, and no real value for the reader.
Many sites publish AI-generated articles without editing, fact-checking, or adding genuine expertise. These pages often rank briefly, then drop sharply after a core algorithm update. Google’s 2024 core updates penalized sites that relied heavily on low-effort AI output (Source: Google Search Central, 2024).
How to fix it: Use AI as a drafting tool, not a publishing tool. Every piece you publish must include original analysis, real examples, and an expert perspective that competitors cannot easily replicate.
Publishing outdated content tells both users and Google that your site is not being maintained. Statistics from 2019, broken product links, and references to discontinued tools all reduce trust and relevance scores.
Search engines reward freshness, especially for topics where information changes regularly, such as SEO, tax laws, or medical guidelines.
How to fix it: Conduct a quarterly content audit. Update statistics, refresh examples, add new context, and change the published date only when the update is substantive.
E-E-A-T stands for Experience, Expertise, Authority, and Trust. Google’s Quality Rater Guidelines use these signals to evaluate whether content deserves to rank. Sites with no author bios, no credentials, and no transparent business information score poorly on these signals.
This is especially important for YMYL (Your Money or Your Life) topics, including legal, financial, medical, and home services content.
How to fix it: Add detailed author bios, cite your credentials and experience, link to credible external sources, and make your business information easy to find.
Targeting the wrong keywords is a foundational mistake. A roofing company ranking for “types of roofing materials” attracts curious readers, not paying customers. Every keyword you target must connect to a real business outcome.
Long-tail keywords are longer, more specific phrases with lower search volume but much higher conversion intent. A search like “emergency AC repair Lafayette LA tonight” signals a buyer ready to call right now.
According to Semrush research, long-tail keywords account for the majority of all search queries. Ignoring them means missing the traffic that converts best.
How to fix it: Build content clusters around a core topic, then create supporting pages targeting long-tail variations.
Keyword stuffing is the practice of repeating a target keyword so often that the content reads unnaturally. Google has penalized this practice since its Panda algorithm update. It damages both user experience and rankings.
How to fix it: Write for people first. Use your primary keyword once in the title, once in the first 100 words, once in a subheading, and naturally throughout the body. Use semantic variations rather than exact repeats.
Keyword cannibalization happens when two or more pages on your site compete for the same keyword. Google gets confused about which page to rank. As a result, both pages rank lower than either would if they stood alone.
How to fix it: Audit your site for overlapping keyword targets using Semrush or Ahrefs. Consolidate competing pages via 301 redirects, or differentiate their intent clearly enough that they serve different audiences.
High search volume means nothing if the keyword is too competitive to rank for, too broad to convert, or completely misaligned with your services. Focusing only on volume is a strategy that produces rankings for keywords that never bring revenue.
How to fix it: Evaluate every keyword on three dimensions: volume, keyword difficulty, and commercial intent. Prioritize keywords where you can realistically compete and win paying customers.
A small local business targeting “SEO services” nationally is competing against enterprise agencies with thousands of backlinks. Keyword difficulty measures how hard it is to rank for a given term based on the strength of pages currently occupying the top spots.
How to fix it: Use tools like Semrush or Moz to check keyword difficulty scores before investing in content. Target keywords with difficulty scores that your site’s authority can actually compete for.
This mistake is subtle but costly. You might rank a page targeting “SEO audit” but fill it with transactional content pushing a paid service. Users searching for that term usually want educational content. Google detects the mismatch through behavioral signals like bounce rate and time on page.
How to fix it: Revisit every high-priority page and confirm its content format matches the intent of its target keyword.
Orphan pages are pages with no internal links pointing to them. Google’s crawlers discover pages by following links. If a page has no links leading to it, crawlers may never find it, and it will not be indexed.
This problem commonly affects blog posts published without being linked from a category page, older service pages removed from navigation menus, and landing pages created for paid campaigns.
How to fix it: Run a site crawl using Screaming Frog or Semrush. Identify pages with zero internal links and add relevant links from related content.
A canonical tag tells Google which version of a page is the authoritative one. Without it, Google makes its own guess, and it often guesses wrong. Misconfigured canonicals, such as a page pointing to a different page’s canonical or a canonical pointing to a noindex URL, create serious indexing problems.
How to fix it: Audit canonical tags on every page using a crawler. Ensure every canonical points to the correct, indexable master URL.
The robots.txt file tells search engine crawlers which pages to skip. A single misconfigured line can accidentally block your entire site from being crawled. This is one of the most catastrophic technical SEO mistakes, and it happens more often than you would expect.
How to fix it: Use Google Search Console’s robots.txt tester. Confirm that your important pages are not listed under Disallow rules.
A noindex tag tells Google not to include a page in search results. This is useful for admin pages and thank-you pages. However, placing noindex tags on category pages, service pages, or blog posts removes them from search results entirely.
How to fix it: Run a crawl and filter for pages with noindex directives. Remove any that are on pages you want indexed.
Broken links and 404 errors frustrate users and waste crawl budget. When Google follows a link and finds a dead page, it signals poor site maintenance. Users who hit a 404 page leave immediately, which inflates your bounce rate.
How to fix it: Use Screaming Frog or Google Search Console’s Coverage report to find 404 errors. Redirect broken URLs to the most relevant live page using 301 redirects.
A redirect chain happens when URL A redirects to URL B, which redirects to URL C. Each hop in the chain dilutes the link equity passing through it. Redirect loops occur when two pages redirect to each other, creating an infinite cycle that makes both pages inaccessible.
How to fix it: Audit all redirects using a crawler. Straighten redirect chains so every old URL points directly to its final destination in a single hop.
An XML sitemap is a file that lists all the pages on your site that you want Google to index. Without one, Google relies entirely on link discovery to find your pages, which is slower and less reliable.
How to fix it: Generate an XML sitemap using your CMS plugin (Rank Math, Yoast, or similar). Submit it to Google Search Console under the Sitemaps section.
Crawl budget is the number of pages Google will crawl on your site in a given period. Sites with thousands of low-value pages, parameter-based URLs, and duplicate content force Google to waste this budget on pages that should never be indexed.
Index bloat means your site has more indexed pages than it has meaningful content, which dilutes overall site quality signals.
How to fix it: Block low-value URLs via robots.txt or noindex tags. Use canonical tags to consolidate near-duplicate pages.
Clear, descriptive URLs help both users and Google understand what a page is about. URLs like /page?id=4829 tell Google nothing. URLs like /lafayette-la-seo-services/ are self-explanatory.
How to fix it: Use short, keyword-rich URLs. Separate words with hyphens, not underscores. Remove unnecessary parameters where possible.
Structured data, also called schema markup, is code you add to your pages to help Google understand their content. A properly implemented schema can trigger rich results: star ratings, FAQs, breadcrumbs, and event listings in search results. These rich results significantly improve click-through rates.
Sites without schema markup miss out on these enhanced listings entirely, even when they rank well.
Even if you add schema, errors in the code prevent Google from using it. Common errors include missing required fields, incorrect property values, and mismatched schema types.
How to fix it: Test every schema implementation using Google’s Rich Results Test tool. Fix any errors or warnings flagged in the report.
Organization schema tells Google your business name, logo, website URL, contact information, and social profiles. Without it, Google builds this knowledge graph data on its own, which often results in incomplete or incorrect information appearing in search results.
How to fix it: Add an Organization schema to your homepage. Include your business name, URL, logo, phone number, email, and social media links.
For Lafayette, LA businesses, Local Business schema is essential. It tells Google your business address, service area, hours of operation, and phone number in a machine-readable format. This directly supports local search rankings and Google Maps visibility.
How to fix it: Add Local Business schema to every location-specific page on your site. Use a plugin like Rank Math or implement it manually via JSON-LD.
Page speed is a confirmed Google ranking factor. According to Google’s own research, as page load time goes from one second to three seconds, the probability of a mobile user bouncing increases by 32%.
Slow pages frustrate users and signal to Google that your site delivers a poor experience.
Core Web Vitals are three specific speed metrics Google measures: Largest Contentful Paint (LCP), Interaction to Next Paint (INP), and Cumulative Layout Shift (CLS). Sites that fail these thresholds perform worse in competitive search results.
How to fix it: Use Google PageSpeed Insights and the Core Web Vitals report in Google Search Console. Address the specific issues flagged, starting with LCP, which typically has the most impact.
Google uses mobile-first indexing, meaning it crawls and indexes the mobile version of your site first. If your mobile experience is broken, your rankings suffer across all devices.
How to fix it: Run the Mobile-Friendly Test in Google Search Console. Fix layout issues, ensure tap targets are large enough, and confirm text is readable without zooming.
Your title tag is the blue link text that appears in search results. It is one of the strongest on-page ranking signals and the primary factor driving whether a user clicks your result.
Common mistakes include titles over 60 characters (which get truncated), titles that omit the primary keyword, and duplicate title tags across multiple pages.
How to fix it: Write a unique title tag for every page. Keep it under 60 characters. Place the primary keyword near the front.
A meta description does not directly influence rankings, but it directly influences whether users click your result. A weak or missing meta description results in Google pulling random text from your page, which often looks incomplete and unappealing.
How to fix it: Write a compelling meta description for every page. Keep it under 155 characters. Include your keyword and a clear reason to click.
Header tags (H1 through H6) organize your content hierarchically. A page with no headers, or headers used randomly for styling rather than structure, tells Google your content is disorganized. It also makes the page harder to scan for readers.
How to fix it: Use one H1 per page. Use H2s for major sections. Use H3s for subsections within those sections. Never skip heading levels.
Large, uncompressed images are one of the most common causes of slow page load times. Unoptimized images also lack context for search engines, which cannot see images the way humans do.
How to fix it: Compress all images before uploading. Use modern formats like WebP. Set explicit width and height attributes to prevent layout shift.
Alt text is a written description of an image. It serves two purposes: it helps Google understand what the image shows, and it provides accessibility for visually impaired users using screen readers. Missing alt text is a missed ranking opportunity for image search and a compliance issue.
How to fix it: Add descriptive alt text to every image on your site. Include relevant keywords naturally, without stuffing them.
Google monitors behavioral signals like bounce rate, time on page, and pages per session. These signals reflect whether users find your content valuable. High bounce rates and short session durations tell Google your page did not satisfy the search.
How to fix it: Improve content quality, add relevant internal links to keep users on your site longer, and match your content format to what users actually want.
Google’s Page Experience signals include whether your content is accessible without being blocked by popups or ad units. Sites that show large interstitials immediately after a user arrives may face ranking penalties under Google’s Intrusive Interstitials policy.
How to fix it: Use popups sparingly. Never show a full-screen popup before the user has had a chance to read your content. Keep ad density reasonable.
Internal links connect pages within your own website. They help Google discover new pages, understand site structure, and distribute authority across your site. A site with poor internal linking leaves its most important pages without the link equity they need to rank.
Anchor text is the clickable text of a link. Generic anchors like “click here” or “read more” give Google no context about the destination page. Descriptive anchors like “Lafayette LA SEO services” communicate exactly what the linked page covers.
How to fix it: Every internal link should use descriptive, keyword-relevant anchor text that describes the destination page’s topic.
Your most valuable service pages and money-making content should receive the most internal links. When these pages have few or no internal links, they receive little authority from your other content and rank lower than they should.
How to fix it: Identify your most important pages. Audit how many internal links point to each one. Add contextual links from related blog posts and service pages.
Adding dozens of internal links on a single page dilutes the value passed through each individual link. It also overwhelms users and can feel spammy to Google.
How to fix it: Limit internal links to those that genuinely add value for the reader. Five to ten well-placed links per page is a reasonable guideline for most content.
Link equity, sometimes called link juice, flows from high-authority pages to the pages they link to. If your homepage receives strong backlinks but never links to your core service pages, those service pages miss out on significant ranking power.
How to fix it: Build an internal linking hierarchy. Let your homepage and high-traffic blog posts funnel authority to the pages you most want to rank.
One backlink from a respected industry publication is worth more than 100 links from low-authority directories. Chasing link quantity without filtering for quality is a strategy that produces minimal results and can trigger a manual penalty.
Buying backlinks from link farms, private blog networks (PBNs), or irrelevant directories violates Google’s Webmaster Guidelines. If Google detects a pattern of paid links, it can apply a manual action that removes your site from search results entirely. According to Google Search Central, link schemes are one of the most consistently penalized violations.
How to fix it: Earn links through genuine outreach, high-quality content, and digital PR. Never pay for links from services that promise hundreds of backlinks at a low price.
Toxic backlinks are links from spammy, irrelevant, or penalized sites. Over time, these links can reduce your domain’s trustworthiness in Google’s eyes, especially if they appear in large volumes.
How to fix it: Audit your backlink profile using Semrush or Ahrefs. Identify toxic links. Reach out to the linking site to request removal. Use Google’s Disavow Tool as a last resort.
A backlink from a cooking blog pointing to a roofing company website sends a confusing signal to Google. Relevance matters. Links from sites in your industry or geographic area carry far more weight than links from unrelated domains.
How to fix it: Target link-building outreach toward sites that serve your industry, your geographic area, or your target audience.
Publishing great content and waiting for links to appear organically is a slow strategy. Most pages that earn strong backlinks do so because someone actively promotes them through outreach, social media, partnerships, or digital PR.
How to fix it: Build a promotion checklist for every piece of content you publish. Share it with relevant publications, industry contacts, and community platforms.
When too many backlinks pointing to your site use the exact same keyword-rich anchor text, it looks unnatural to Google. This pattern can trigger a Penguin filter penalty, which suppresses your rankings for those exact keywords.
How to fix it: Aim for a natural anchor text profile. A healthy mix includes branded anchors, naked URLs, generic anchors, and a minority of keyword-rich anchors.
Google rewards content written by identifiable experts. Anonymous blog posts with no byline, no bio, and no credentials score poorly on the Trust dimension of E-E-A-T. For topics related to health, law, finance, or home services, this matters even more.
How to fix it: Add a clear author bio to every article. Include credentials, industry experience, and a link to the author’s professional profile.
Users and Google both look for evidence that a business is legitimate. Missing or outdated credentials, lack of customer testimonials, absence of case studies, and no press mentions all reduce credibility.
How to fix it: Add testimonials, certifications, awards, and case studies to relevant pages. Link to external mentions of your business.
Visitors want to know who they are dealing with. A website without a clear “About” page, no visible team members, no physical address, and a generic contact form signals opacity. Google’s Quality Raters flag these gaps when evaluating trust.
How to fix it: Create a detailed About page that explains who you are, your experience, and your business history. Make contact options prominent and easy to find.
Trust indicators include SSL certificates, clear privacy policies, visible terms of service, professional design, and third-party review badges. Missing these signals can make users leave before they even read your content.
How to fix it: Install an SSL certificate if you have not already. Add a privacy policy. Display trust badges from review platforms like Google, BBB, or industry associations.
For any business in Lafayette, LA, your Google Business Profile (GBP) is the foundation of local search visibility. An incomplete profile, missing hours, no photos, no service descriptions, and no website link perform significantly worse than a fully optimized one.
How to fix it: Fill in every field in your GBP. Add high-quality photos, write detailed service descriptions, and verify your business address. The SEO optimization specialists at Sites N Apps can audit and optimize your profile.
NAP stands for Name, Address, and Phone Number. When your business name, address, or phone number appears differently across your website, GBP, Yelp, and other directories, Google cannot confidently confirm your business details. This inconsistency directly hurts local rankings.
How to fix it: Audit your NAP across every online directory. Standardize every listing to match exactly what appears on your website.
Targeting “SEO services” is a national competition. Targeting “SEO services Lafayette LA” is a local competition you can actually win. Local keywords include your city name, neighborhood, nearby landmarks, and service area terms.
How to fix it: Research local keyword variations for every service you offer. Incorporate these naturally into your page titles, headings, and body content.
Google Maps rankings depend on three factors: relevance, distance, and prominence. Many local businesses focus only on distance and ignore relevance and prominence, two factors they can directly control.
How to fix it: Optimize your GBP category selection carefully. Build local citations. Earn genuine customer reviews. Add location-specific content to your website.
If you serve multiple neighborhoods or cities around Lafayette, LA, a single homepage cannot rank for all of them effectively. Each service area deserves its own dedicated landing page with locally relevant content.
How to fix it: Create individual location pages for each city or neighborhood you serve. Include local references, specific services, and locally relevant testimonials.
A local citation is any online mention of your business name, address, and phone number. Citations on directories like Yelp, BBB, Angi, and industry-specific platforms reinforce your local relevance to Google.
How to fix it: Build citations on the top 30-50 local and industry directories. Ensure every citation uses consistent NAP information.
Reviews are a direct local ranking factor. According to Search Engine Journal, businesses with more positive reviews consistently outperform competitors in the local map pack. Yet most businesses have no active strategy for asking customers to leave reviews.
How to fix it: Create a simple review request process. Send a follow-up email or text after every completed service with a direct link to your Google review page.
Google rewards businesses that actively engage with their reviews. Failing to respond to negative reviews looks defensive and careless. Failing to respond to positive reviews is a missed relationship-building opportunity.
How to fix it: Respond to every review, positive and negative, within 48 hours. Be professional, specific, and thank reviewers by name when possible.
Your GBP allows you to define a service area. Many businesses either skip this step or set it too broadly, which reduces the profile’s relevance for specific local searches.
How to fix it: Set your service area precisely based on where you genuinely serve customers. Avoid claiming areas far outside your actual reach.
It is not. AI search engines like Perplexity, Google’s AI Overviews, and ChatGPT retrieve and cite content differently from traditional search results. Traditional SEO prioritizes ranking a URL. AI optimization prioritizes making your content citable, structured, and verifiable.
AI systems prefer content that answers specific questions directly, uses clear formatting, and provides complete answers in self-contained paragraphs. Content written in a flowing narrative without clear structure rarely gets cited by AI tools.
How to fix it: Use question-based headings, definition-first formatting, and answer paragraphs that stand alone. Every section should be able to answer a specific question without requiring surrounding context.
Entity optimization means ensuring Google clearly understands the people, places, organizations, and concepts your content is about. This is how Google’s Knowledge Graph works, and it is how AI tools identify authoritative sources on specific topics.
How to fix it: Be explicit about your entity relationships. Name your business, your location, your industry, and your key topics clearly and consistently across your site.
If a user asks an AI tool a question and your content has the answer buried five paragraphs deep with no clear formatting, the AI will skip your page. Clear answers, at the top of each section, dramatically improve your chances of being cited.
How to fix it: Open every major section with a direct answer. Use formatting like numbered lists, definition blocks, and short paragraphs to make the answer easy to extract.
HTTPS is a confirmed Google ranking factor. Sites without SSL certificates display a “Not Secure” warning in browsers, which causes users to leave immediately. This is a problem that was preventable years ago and is completely unacceptable in 2025.
How to fix it: Install an SSL certificate through your hosting provider. Most hosting companies offer free SSL via Let’s Encrypt. After installing, redirect all HTTP traffic to HTTPS using a 301 redirect.
Outdated plugins, themes, and CMS software create vulnerabilities that hackers exploit. A compromised site can be flagged as dangerous by Google and removed from search results entirely.
How to fix it: Enable automatic updates for your CMS, plugins, and themes. Conduct monthly security scans using a tool like Wordfence or Sucuri.
Privacy policies, terms of service pages, and cookie consent notices are not optional extras. They are legal requirements in many jurisdictions and trust signals that affect how seriously visitors take your business.
How to fix it: Publish a clear, current privacy policy. Implement a cookie consent banner if you collect user data. Link to these documents from your site’s footer.
Google Search Console (GSC) is a free tool that shows which queries bring users to your site, which pages have indexing issues, and where your site has technical errors. It is the starting point for any serious SEO audit.
Check the Coverage report for indexing errors, the Performance report for keyword rankings, and the Core Web Vitals report for page experience issues.
Google Analytics 4 (GA4) tells you how users behave on your site after they arrive. High bounce rates, low session durations, and poor engagement rates all point to content or UX problems that need fixing.
Google PageSpeed Insights measures your Core Web Vitals scores and provides specific recommendations for improving load time. Run every important page through this tool and prioritize fixes that affect LCP and CLS.
Semrush Site Audit crawls your entire site and categorizes issues by severity: errors, warnings, and notices. This tool surfaces technical issues that manual review would miss and prioritizes them so you know where to start.
Your site’s index coverage tells you how many pages Google has indexed versus how many it has found. Large gaps between crawled and indexed pages signal quality or technical issues that need investigation.
Rankings and organic traffic are your outcome metrics. All technical fixes, content improvements, and link-building efforts should eventually show up as ranking improvements and traffic growth. Track these monthly in GSC and GA4.
Not all fixes are equal. Address critical technical errors first, since they block indexing entirely. Next, fix on-page issues on your highest-traffic and highest-value pages. Finally, build out content and links for sustained long-term growth.
A practical prioritization framework:
SEO without tracking is guesswork. You cannot improve what you do not measure. Many business owners make changes to their sites and never confirm whether those changes improved rankings or traffic.
Google Search Console sends alerts about manual actions, security issues, and indexing errors. Ignoring these warnings is one of the most expensive SEO mistakes you can make. Some warnings, left unaddressed, can cost you months of rankings.
How to fix it: Review Search Console at least once a week. Set up email alerts for critical issues.
A technical SEO audit conducted once and then abandoned becomes outdated within months. Sites change, plugins update, redirects break, and new content creates new crawl issues.
How to fix it: Schedule a full technical audit every three to six months. Use Semrush Site Audit or Screaming Frog on a recurring basis.
Your competitors are not standing still. They are publishing new content, earning new backlinks, and optimizing their pages. Failing to monitor what is working for them means missing signals about where your market is moving.
How to fix it: Track your top three to five competitors in Semrush or Ahrefs. Monitor their new content, new backlinks, and ranking changes monthly.
Google updates its algorithm thousands of times per year. Major named updates, Core Updates, Helpful Content updates, and Spam updates can significantly shift rankings in days.
How to fix it: Follow Google Search Central’s official blog and trusted sources like Search Engine Journal for update announcements. After each major update, review your ranking and traffic data for patterns.
SEO mistakes are not rare edge cases; they are the default state of most websites that have never undergone a proper audit. From thin content and broken links to inconsistent NAP data and missing schema, every uncorrected mistake compounds over time and widens the gap between your site and the competition. The good news is that every mistake covered in this guide is fixable, and fixing them produces measurable results.
The hardest part is knowing where to start. Most business owners discover they have dozens of overlapping issues, each requiring a different fix. Prioritizing by impact, starting with indexing errors and moving through on-page issues, internal linking, and then off-page strategy, gives you a clear path forward without overwhelming your resources.
At Sites N Apps, we specialize in identifying exactly these issues for businesses in Lafayette, LA, and helping them fix them systematically. Whether your site is losing traffic due to technical errors, weak content, or poor local optimization, we can show you precisely what is wrong and how to correct it. Contact us today to schedule a consultation or request your free website audit to see exactly where your site stands.
The most damaging mistakes for small businesses are an incomplete Google Business Profile, inconsistent NAP data across directories, thin or duplicate content, missing schema markup, and no local keyword strategy. These issues directly prevent the site from appearing in local search results where customers are actively looking.
Run your site through Google Search Console and check the Coverage and Performance reports. Then use a tool like Semrush Site Audit or Screaming Frog for a full technical crawl. These tools surface hidden issues like orphan pages, broken links, and misconfigured canonicals that are invisible without a crawl.
Simple fixes like correcting title tags, adding schema, and fixing 404 errors can show results within two to four weeks. More substantial improvements, such as earning new backlinks and rebuilding internal linking structure, typically take three to six months to reflect meaningfully in rankings and traffic.
Yes. Google’s Webmaster Guidelines explicitly prohibit paid link schemes. If Google detects a pattern of purchased links, it can apply a manual action that removes affected pages from search results. The risk far outweighs any short-term ranking bump the links might produce.
E-E-A-T stands for Experience, Expertise, Authority, and Trust. Google’s Quality Rater Guidelines use these dimensions to evaluate whether content deserves to rank highly, especially for topics that affect people’s health, safety, finances, or major decisions. Sites that demonstrate genuine expertise and transparency consistently outperform anonymous, credential-free competitors.
A comprehensive technical audit should be conducted every three to six months. A lighter monthly review of Search Console data, ranking reports, and traffic trends is recommended in between. After any major Google algorithm update, running a targeted audit to check for ranking changes is good practice.
Struggling to compete for high-search-volume keywords? We help businesses like yours increase visibility, drive more traffic, and dominate competitive search terms—all while keeping your costs low. Our proven strategies focus on long-term growth and measurable results.