Starting an online store is exciting! If you want to sell things online, Shopify makes it easy. In this guide, I’ll show you how to design a Shopify website step by step. Don’t worry – you don’t need to be a tech expert. Anyone can do this!
Learn more about e-commerce website design principles to create a store that converts.
Shopify is a tool that helps you build an online store. Think of it like building blocks – you pick what you want and put it together. Over 4 million stores use Shopify because it’s simple and works great.
When you design a Shopify website, you get:
Before you jump in, let’s plan a bit. This makes everything easier later. Understanding the complete website design process helps you plan better.

Pick Your Store Colors
Choose 2-3 colors that match your brand. If you sell toys, you might pick bright, fun colors. If you sell clothes, you might want calm, nice colors. Write down your color choices so you remember them.
Know Who Will Shop at Your Store
Think about your customers. Are they young people? Parents? What do they like? This helps you design a website they’ll enjoy using. If your customers are older, use bigger text. If they’re young, use trendy colors.
Look at Other Stores
Visit some other online stores in your niche. What do you like about them? What looks good? You can learn a lot by looking around. Save screenshots of designs you love.
Make a List of Pages You Need
Write down all the pages your store needs. Most stores have a home page, product pages, about page, contact page, and shipping info page. You might need more depending on what you sell.
Shopify has different plans. Most new stores start with the Basic plan at $39 per month. It gives you everything you need to design a Shopify website and start selling.
The Basic plan includes an online store, unlimited products, 24/7 support, and sales channels. This is perfect when you’re just starting. You can always upgrade later when your store grows bigger.
A theme is like a template for your store. It controls how everything looks – the colors, fonts, layout, and style.
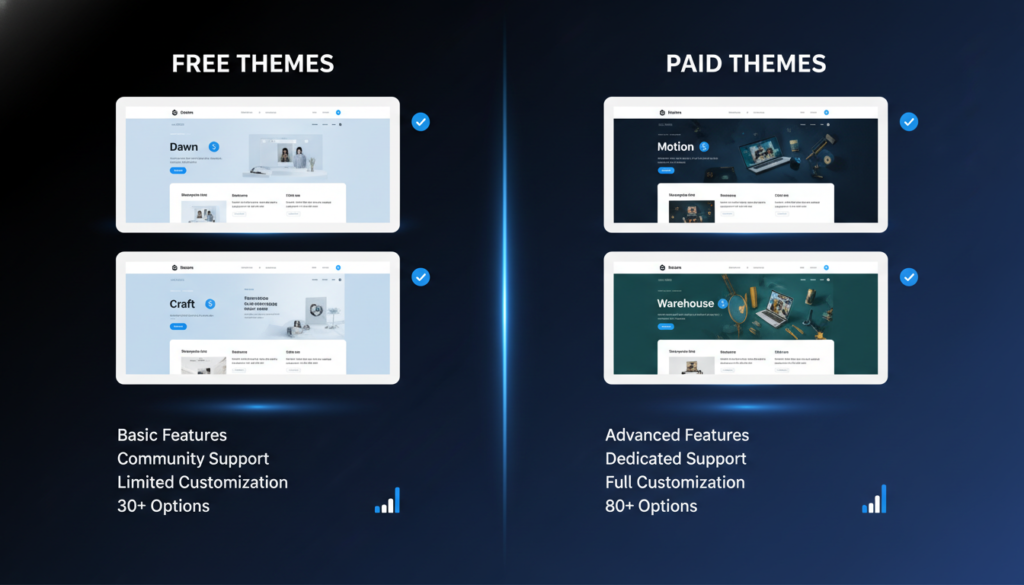
Start with Free Themes
Shopify gives you free themes that look professional. Dawn is clean and simple, works for any store. Sense is good for stores with lots of products. Craft is nice for handmade items. These free themes are perfect for beginners.
Consider Paid Themes Later
Paid themes cost between $180-$400. They give you more design options and extra features. But honestly, start with a free theme first. You can always change later when you know exactly what you need.
How to Install Your Theme
Log in to your Shopify account. Click on “Online Store” on the left side, then click “Themes.” Click “Visit Theme Store” to browse all available themes. When you find one you like, click “Try theme” to preview it. If you love it, click “Add to theme library” and then “Publish” to make it live on your store.
Your home page is super important. It’s the first thing people see when they visit your store. Understanding UI/UX fundamentals helps you create a homepage that attracts and engages visitors.

Add a Big Hero Image
Put a nice, big image at the top of your home page. This is called a hero image. It should show what your store is about. If you sell shoes, show someone wearing cool shoes. If you sell food, show delicious-looking meals. Make this image bright and clear.
Show Your Best Products
Add a section below the hero image that shows your most popular products. Pick 4-8 of your best items. This helps people find things to buy quickly. They don’t have to search through your whole store.
Tell Your Story Quickly
Add a short section that explains what makes your store special. Keep it to 2-3 sentences. Something like: “We make handmade candles using natural ingredients. Every candle is poured with love in our small workshop.” People connect with real stories.
Add Trust Badges
Show little badges that say things like “Free Shipping,” “30-Day Returns,” or “Secure Checkout.” Put these near the bottom of your home page. They make people feel safe shopping at your store.
Edit Your Home Page Easily
Go to “Online Store” and click “Customize.” You’ll see your website on the right side. On the left, you can add, remove, or change sections. Click any section to edit the text, images, or settings. Drag sections up or down to move them around. Always click “Save” when you’re done making changes.
Navigation is the menu that helps people move around your store. Think of it like road signs – they show people where to go.
Keep Your Main Menu Simple
Your main menu should have just a few items: Home, Shop (or your product categories like “Men’s Shoes” or “Women’s Shoes”), About, and Contact. That’s it. Don’t add ten different menu items – it’s too confusing.
Create Your Menu
Go to “Online Store” then click “Navigation.” Click “Main menu” to edit it. Click “Add menu item” to add new links. Type the name (like “About Us”) and choose where it links to. Click “Save menu” when done.
If you have many products, you can organize your Shop menu into categories. For example, if you sell clothes, you might have “Shop” with sub-menus for “Shirts,” “Pants,” and “Accessories.”
Now the fun part – adding what you sell! Take your time here because good product pages help you make sales.
Upload Great Product Photos
Good photos are really important. People can’t touch or see your product in person, so photos are everything. Use clear, bright photos that show your product well. Take photos from different angles – front, back, side, and close-ups of important details.
You need at least 3-4 photos per product. More is even better. If you sell clothes, show someone wearing them. If you sell furniture, show it in a real room. This helps people imagine having it.
Tips for good product photos: Use natural light from a window, use a plain white or light background, make sure the product is in focus, and clean the product before taking photos.
Write Clear Product Descriptions
Tell people about your product in simple words. Pretend you’re explaining it to a friend. Start with what it is, then explain what it does or why someone needs it.
Answer these questions in your description: What is it? What does it do? What size is it? What’s it made of? Why should someone buy it? How do they use it?
Keep sentences short. Use bullet points to list features. This makes it easy to read quickly. For example:
“This blue cotton t-shirt is soft and comfortable. Perfect for everyday wear.
What makes it special:
Set Your Price Clearly
Type in how much the product costs. Be clear about whether shipping is included or extra. If you have a sale, show both the old price and the new price. People love seeing that they’re getting a deal.
Add Product Variants
If your product comes in different colors or sizes, add variants. Click “Add variant” when creating your product. For example, a t-shirt might come in small, medium, large, and extra large. Or in red, blue, and green.
Set the price for each variant if they’re different. Add separate photos for each color so people can see exactly what they’re getting.
When you design a Shopify website, product pages are where the magic happens. This is where people decide to buy or leave.
Use Clear Product Titles
Use simple, clear names that tell people exactly what the product is. Instead of fancy names like “Super Amazing Cool Thing,” say “Blue Cotton T-Shirt – Size Large.” Be specific and honest.
Make the Buy Button Stand Out
Your “Add to Cart” button should be big and easy to see. Use a bright color that stands out from the rest of your page. Put it near the top of the page so people don’t have to scroll to find it. Make the button say exactly what it does – “Add to Cart” or “Buy Now.”
Show Related Products
At the bottom of each product page, show similar items. This is called cross-selling. If someone is looking at red shoes, show them other red items or other shoes. This helps people discover more products they might like.
Add Customer Reviews
Let customers leave reviews and ratings. Good reviews are powerful – they help other people decide to buy. When someone says, “This product is amazing!” it means more than anything you can say.
You can add a review app from the Shopify App Store. Judge.me is a popular free option. After someone buys something, send them an email asking for a review.
Include Size Guides or Measurement Charts
If you sell anything with sizes – clothes, shoes, furniture, rings – add a size guide. This helps people pick the right size and reduces returns. You can make a simple chart showing measurements or add photos showing how to measure.
Make your store look unique and match your brand personality.
Change Your Store Colors
Click “Online Store” then “Customize.” Click “Theme settings” at the bottom left. Click “Colors,s” and you’ll see all the color options for your store.
Change the background color, text color, button color, and link color. Use your brand colors here. Your main brand color should be used for buttons – this makes them pop and encourages clicks.
Don’t use too many different colors. Stick to 2-3 main colors plus black and white. Too many colors look messy and unprofessional.
Pick Fonts That Are Easy to Read
In Theme settings, click “Typography.” Choose a font for headings (the big text) and a font for regular text (the small text).
Keep it simple. Fancy, curly fonts are hard to read, especially on phones. Use clean, simple fonts. Arial, Helvetica, and similar fonts work great. You can use a slightly fancier font for headings, but keep body text simple.
Make sure your fonts match your brand personality. A toy store might use rounded, friendly fonts. A luxury watch store might use elegant, thin fonts.
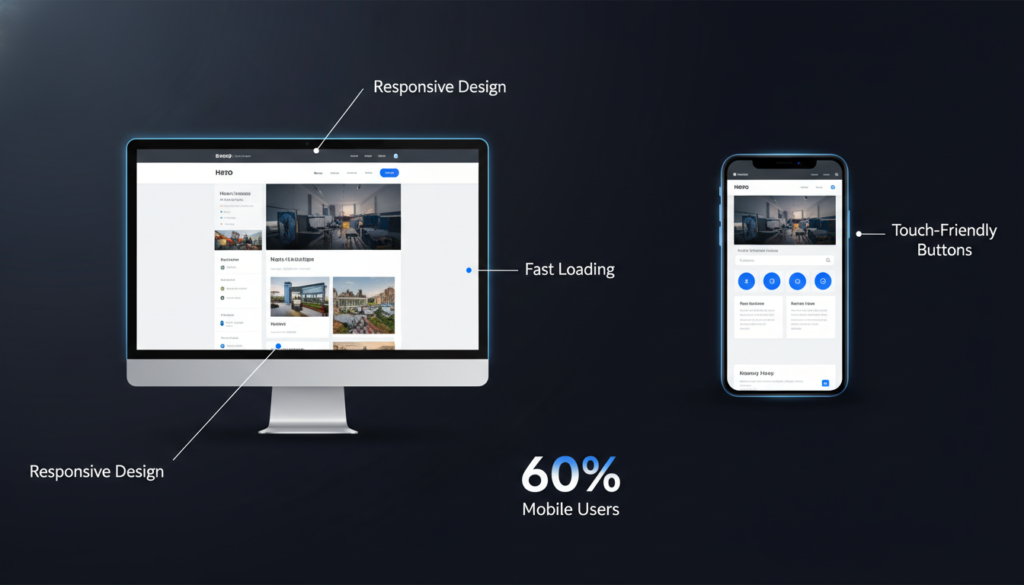
More than half of all online shopping happens on phones. That’s why mobile-first responsive web design is essential for any e-commerce store.
Check Mobile View While Designing
In the theme editor, click the phone icon at the top. This shows how your store looks on a phone. Check every page in mobile view before you publish.
Make sure images aren’t too big for the screen, text is big enough to read without zooming, buttons are easy to tap with a finger, and nothing is cut off or hidden.
Make Buttons Finger-Friendly
Phone users tap with fingers, not a mouse cursor. Fingers are bigger than cursors. Make your buttons nice and big – at least the size of a fingertip. Leave space between buttons so people don’t accidentally tap the wrong one.
Simplify Mobile Menus
Your mobile menu should be even simpler than your desktop menu. Use a hamburger menu (those three lines) that opens when tapped. Keep menu items to 5 or fewer.
Test on Real Phones
Don’t just use the preview. Actually, open your store on your phone and try using it. Better yet, have friends test it on their phones too. Different phones show things differently.
The shopping cart is where customers see everything they’re buying before checkout.
Design Your Cart Page
In the theme editor, go to the cart page. Make sure customers can easily see what they’re buying, the price for each item, the total price, and how to change quantities or remove items.
Add trust badges on the cart page, like “Secure Checkout” or “SSL Protected.” This reminds people that their information is safe.
Show shipping costs on the cart page if possible. People hate surprise costs at checkout. If shipping depends on their address, say something like “Shipping calculated at checkout.”
Add Helpful Features
Let customers add a note with their order. Some people want to send gifts with messages. This is a nice touch.
Consider adding a progress bar showing they’re almost done: “Cart → Shipping → Payment.” This shows people how close they are to finishing.
Make the Checkout Button Obvious
Your “Checkout” button should be the most visible thing on the cart page. Use your brand color, make it big, and put it at the top and bottom of the cart.
The checkout page is where people pay. Make it simple, fast, and trustworthy.
Add Your Branding
Only Shopify Plus stores can fully customize checkout design, but all stores can add their logo and brand colors. Go to “Settings” then “Checkout.” Upload your logo, choose your brand colors, and add a banner image if you want.
This makes the checkout page feel like part of your store, not some random payment page. It builds trust.
Show Security and Trust Signals
Add text that says “Secure payment,” “Your information is safe,” and “SSL encrypted.” Show payment badges for credit cards you accept – Visa, Mastercard, PayPal, etc. Following website security best practices builds customer trust and protects their data.
Put these near where people enter their card details. It calms their nerves about entering sensitive information.
Keep It Simple
Only ask for information you absolutely need. Every extra field you add makes more people abandon their cart. Name, email, address, and payment – that’s it.
Offer guest checkout. Don’t force people to create an account. They just want to buy and go. You can ask them to create an account after they purchase.
Your store needs more than just product pages. These other pages build trust and answer questions.
Write an About Us Page
Tell your story. Why did you start this store? What do you care about? What makes you different?
Keep it personal and friendly. Use “I” or “we” – not “the company.” People buy from people, not faceless businesses. Add a photo of yourself or your team. This builds a real connection.
For example: “Hi, I’m Sarah! I started making candles in my kitchen five years ago. I was tired of candles with weird chemicals, so I taught myself to make natural ones. Now I pour every candle by hand using soy wax and essential oils. No junk, just good smells.”
Make a Contact Page
Make it easy for people to reach you. Add a contact form where people can type messages. This is built into Shopify – just add it to your page.
Also, list your email address, your phone number if you want people to call, and links to your social media accounts.
Answer contact messages quickly – within 24 hours if possible. Good customer service turns one-time buyers into repeat customers.
Create a Shipping & Returns Page
Explain your shipping clearly. How much does it cost? How long does delivery take? Do you ship internationally?
Explain your return policy. Can people return items? How many days do they have? Who pays return shipping? What condition does the item need to be in?
Be honest and fair. A good return policy actually increases sales because people feel safe buying. They know they can return it if it doesn’t work out.
Add an FAQ Page
Answer common questions before people even ask. Think about what customers always ask you. Common questions include:
Do you ship internationally? How do I track my order? What payment methods do you accept? Can I change my order after placing it? What if my item arrives damaged? How do I care for this product?
Write 10-15 frequently asked questions with clear, short answers. This saves you time answering the same questions over and over.
Fast websites make people happy. Slow websites make people leave. If your site takes more than 3 seconds to load, people will close it.

Make Images Smaller
Big image files are the main reason websites load slowly. Before uploading photos to your store, make them smaller.
Resize them to the right dimensions. Your theme tells you the ideal image sizes – check the documentation. Usually, product images should be around 2000 pixels wide, no bigger.
Then compress them to reduce file size without losing quality. Use free tools like TinyPNG or Squoosh. These can cut your file size in half while keeping images looking great.
Don’t Use Too Many Apps
Every app you install adds code to your store. Too much code slows everything down. Only use apps you really need. If you installed an app but don’t use it, delete it.
Check your app list every few months. Remove apps you’re not using anymore. Your store will load faster.
Choose a Fast Theme
Some themes are built better than others. They load faster and work more smoothly. Dawn (Shopify’s free theme) is one of the fastest themes available. It’s built with speed in mind.
If you use a paid theme, check reviews to see if people mention speed. Avoid themes with tons of fancy animations and effects – these look cool but slow everything down.
Test Your Speed
Use Google PageSpeed Insights to test your store’s speed. It’s free. Just type in your store URL, and it shows you how fast your site loads. It also gives suggestions for making it faster.
Aim for a score above 50 on mobile. Above 70 is great. Above 90 is excellent.
When you design a Shopify website, you want people to find it when they search Google. This is called SEO (Search Engine Optimization).
Learn how to optimize website content for SEO to rank higher in search results.
Write Good Page Titles
Every page needs a title that shows up in Google search results. Using the right meta tags can significantly improve your SEO results. Make it clear and include what you sell.
For your home page: “Handmade Candles – Natural Soy Wax Candles | Your Store Name.”
For product pages: “Lavender Soy Candle – 8oz | Your Store Name.e”
Keep titles under 60 characters so they don’t get cut off in search results.
Add Page Descriptions
Under each title, write a short description (called a meta description). This shows up in Google under your title. Make it interesting so people want to click.
For example: “Shop our handmade lavender candles made with pure soy wax and essential oils. Long-lasting, clean-burning, and naturally scented. Free shipping over $50.”
Keep descriptions under 160 characters.
Use Alt Text for All Images
Alt text describes what’s in an image. It helps Google understand your images and helps people who use screen readers.
Click on any image in your store. Look for the “Alt text” field. Describe the image in simple words. For a product photo, use something like “Blue cotton t-shirt on white background” or “Woman wearing red leather jacket.”
Use Keywords Naturally
Use words that people search for, but use them naturally. Follow on-page SEO best practices to improve your store’s search rankings. If you sell soap, use words like “handmade soap,” “natural soap,” and “organic soap” throughout your pages.
Don’t stuff keywords everywhere – that looks spammy. Just write naturally about your products, and keywords will appear naturally.
Create Helpful Product Names
Instead of naming products “Product 1” or using SKU numbers, use descriptive names. “Red Leather Wallet for Men” is much better than “Product RLW-001.”
Google reads these names and shows your products to people searching for them.
Apps add extra features that Shopify doesn’t include by default. But be careful – only add apps you’ll actually use.
Apps for Better Product Images
Loox shows customer photos of your products. When buyers upload photos wearing or using your products, it builds huge trust.
Instagram Feed displays your Instagram posts on your store. This keeps your store feeling fresh and connects your social media to your store.
Apps for Customer Reviews
Judge.me is a free review app that’s easy to use. It lets customers leave star ratings and written reviews.
Yotpo is more advanced with photo reviews and review requests. It costs more but has extra features.
Reviews are super important. They increase sales by 15-30% on average.
Apps for Email Marketing
Klaviyo sends automated emails to customers. Welcome emails, abandoned cart reminders, and “thank you for buying” emails.
Privy creates email signup forms and popups. It helps you collect email addresses from visitors.
Email marketing is one of the best ways to get repeat customers.
Apps for Customer Support
Tidio lets you chat with customers in real-time. They can ask questions, and you answer right away.
Gorgias is a complete customer support tool. It brings all your customer messages (email, chat, social media) into one place.
Remember: Less is More
Start with just 2-3 apps. You can always add more later. Every app slows down your site a tiny bit, so only use what you need.
Before you tell the world about your store, make sure it works perfectly.
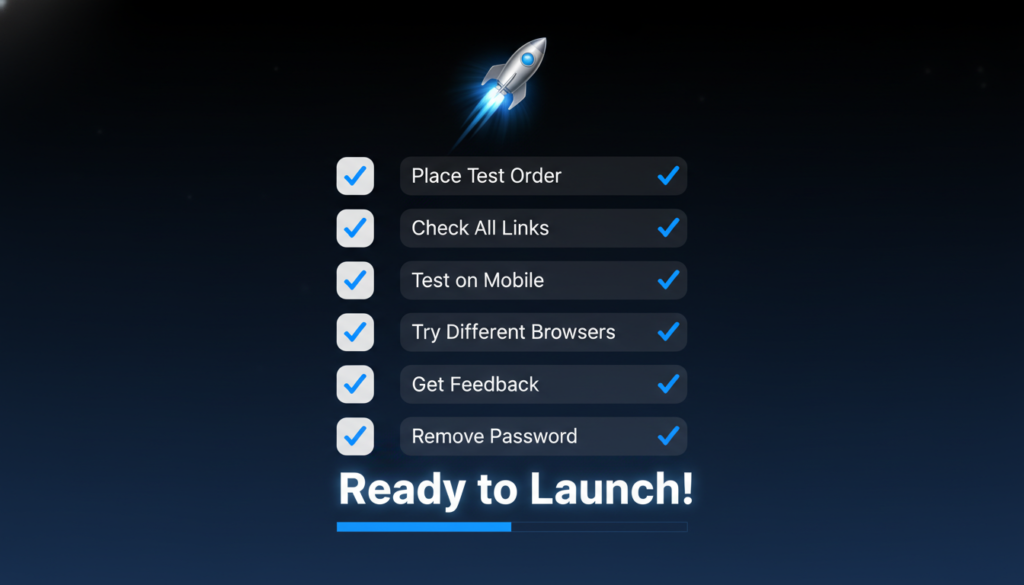
Place a Test Order
Pretend you’re a customer. Go through your entire store and place a test order. Add something to the cart, go to checkout, and complete the purchase.
Shopify has a test mode for payments, so you won’t actually be charged. This lets you see exactly what customers see.
After placing the test order, check if you got a confirmation email. Check if the order shows up in your Shopify admin. Make sure everything works smoothly.
Click Every Link
Go through your store and click every single link. Menu links, footer links, product links, button links – everything.
Make sure they all go to the right place. Broken links look unprofessional and frustrate customers. Fix any broken links before launching.
Check on Different Devices
Look at your store on your computer, your phone, your tablet, and any other devices you have. Ask friends or family to check it on their devices too.
Different devices show websites differently. Something that looks perfect on your laptop might look broken on a phone.
Try Different Web Browsers
Open your store in Chrome, Safari, Firefox, and Edge. Make sure it looks good in all of them.
Most people use Chrome, but some use other browsers. You want your store to work for everyone.
Get Feedback from Friends
Have 2-3 friends visit your store and give honest feedback. Ask them specific questions:
Is anything confusing? Can you find products easily? Would you feel safe entering your credit card? What would you improve? Does anything look broken or weird?
Take notes and fix the problems they find. Fresh eyes catch things you miss.
You’ve worked hard to design a Shopify website. Now it’s time to share it!
Remove the Password
New Shopify stores have a password protecting them. You need to remove this so everyone can visit.
Go to “Online Store” and click “Preferences.” Scroll down to “Password protection.” Uncheck the box that says “Enable password.” Click “Save.”
Now, anyone can visit your store without typing a password.
Announce Your Launch
Share your store everywhere you can. Post on Facebook, Instagram, Twitter, TikTok – any social media you use.
Tell friends and family. Email everyone you know. Most early sales come from people you already know.
Write a launch post explaining what you’re selling and why you’re excited about it. Include a link to your store and some photos of your products.
Offer a Launch Special
Consider offering a special discount for your first week. Something like “Grand Opening – 15% off everything with code LAUNCH15.”
This gives people a reason to buy now instead of waiting. It creates excitement and urgency.
Keep Improving Your Store
Your store doesn’t have to be perfect on day one. You can keep making it better over time. Regular website maintenance and ongoing support ensures your store stays updated and secure.
After launch, watch what customers do. Where do they spend time? Where do they leave? Use Shopify’s analytics to learn this.
Make small improvements every week. Add new products, update photos, write blog posts, and improve descriptions. A store that keeps getting better will keep growing.
Learn from others’ mistakes so you don’t make them yourself.
Using Too Much Text
People scan websites – they don’t read every word. Keep text short and simple. Use bullet points, short paragraphs, and lots of white space.
If your product description is 500 words long, cut it in half. People won’t read it all.
Too Many Annoying Pop-Ups
Pop-ups that cover the whole screen are annoying. If you use them, only show one pop-up per visit. Make it easy to close. Don’t show a pop-up the second someone lands on your site – wait at least 30 seconds.
Better yet, skip popups entirely at first. Add them later if you really need them.
Hiding the Price
Always show prices clearly. Don’t make people click through multiple pages to find out how much something costs.
Show the total cost, including shipping, before checkout if possible. Surprise costs at checkout make people abandon their carts.
Using Blurry or Dark Photos
Bad photos make your products look cheap. Take time to get good photos or hire someone to do it.
Use good lighting, clean backgrounds, and show your product clearly. This is worth the effort.
Making Navigation Confusing
If people can’t find things, they’ll leave. Keep your menu simple and logical.
Put your most important pages in the main menu. Don’t bury important stuff in submenus where people won’t find it.
Ignoring Mobile Users
If your store looks bad on phones, you’ll lose more than half your potential customers. Always check the mobile view and make sure it works perfectly.
Having a Slow Website
Nobody waits for slow websites. Compress your images, remove unnecessary apps, and choose a fast theme. Test your speed regularly.
Building a successful store takes time. Here’s how to keep growing.
Add New Products Regularly
Keep your store fresh by adding new products. Even adding one new item per month gives people a reason to come back and check what’s new.
Announce new products on social media. Create excitement around launches.
Write Blog Posts
Start a blog on your Shopify store. Write helpful articles related to your products.
If you sell coffee, write about brewing methods, coffee origins, or recipe ideas. This helps with Google rankings and positions you as an expert.
Collect Email Addresses
Build an email list from day one. Offer something in exchange for emails – a discount code, free shipping, or a helpful guide.
Email your list regularly with new products, sales, and helpful content. Email is one of the best ways to make sales.
Listen to Customer Feedback
Pay attention to what customers say. If multiple people ask the same question, add it to your FAQ. If people complain about something, fix it.
Your customers are telling you how to improve. Listen to them.
Watch Your Numbers
Check your Shopify analytics regularly. Look at how many people visit, which products sell best, where visitors come from, and where people leave your site.
Use this information to make decisions. If a product sells well, get more like it. If a page has a high bounce rate, improve it.
Be Patient
Success doesn’t happen overnight. Most successful stores took months or years to really take off.
Don’t get discouraged if you don’t make sales in the first week. Keep improving, keep marketing, and keep going. Persistence pays off.
Keep Learning
The world of online selling changes constantly. Keep learning new things.
Watch YouTube videos about Shopify and e-commerce. Read blogs and articles. Join Facebook groups for Shopify store owners. There’s always something new to learn.
You now know how to design a Shopify website! It might seem like a lot, but take it one step at a time.
Start with the basics:
You can always add more features and make improvements later.
Remember, every big online store started small. Your store might be simple now, but it can grow into something amazing.
The most important thing is to start. Pick a theme today and begin building. You’ve got this!